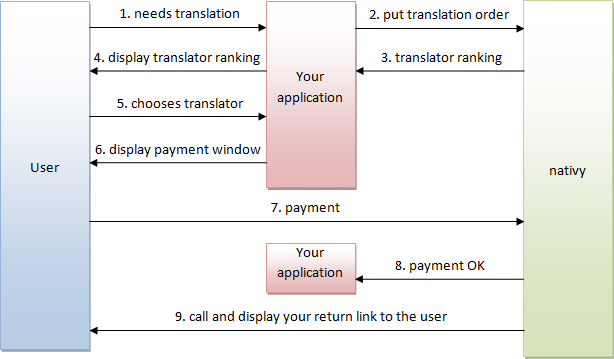
1. user needs translation
The user of your application chooses the texts he wants to translate and clicks
on a button/link to get an offer from nativy.
2. Put translation order
Your application calls nativy connect (see API Methods: /order POST) with required
parameters like source language, target language and the text that needs to be translated
itself.
3. Translator ranking
Based on your parameters provided in step 2, nativy chooses up to 3 translators
who match your parameters and returns them to your application. The translators
are ranked by 4 criteria: frequent cooperation, strong text matching, quick delivery
and low price (see API Methods: /order POST # criteria).
4. display translator ranking
It’s up to you how you display the ranking information, e.g. you may display just
the first translator in the ranking which matches the user criteria best. Your may
orientate on how nativy itself displays the ranking:
5. user chooses translator
In the picture above the user can click somewhere in one of the three rows to choose
a translator, you may also display a button for each translator to choose.
6. display payment window
After the user has chosen a translator you have to open the nativy payment window.
The URL to this window was returned before by calling /order (see API Methods: /order
POST #return parameters).
Your application needs to append a "return_link" parameter to this link ("&return_link=http://...")
before calling it, so nativy connect can call this "return_link" after the user
has successfully paid.
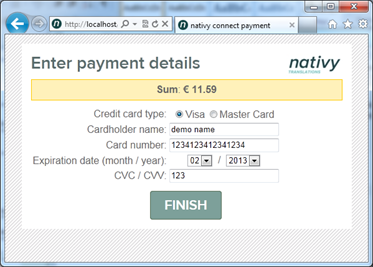
7. payment
Users are able to pay translations via Visa or Master Card. The payment window looks
like this:

8. payment OK
If the user successfully completes the payment process, nativy connect calls the
callback link (you provided before with the order post) with the orderid and "?paid=1"
as parameters.
9. call and display your return link to the user
nativy connect calls the return link (you provided before with the order post) in
the payment window.